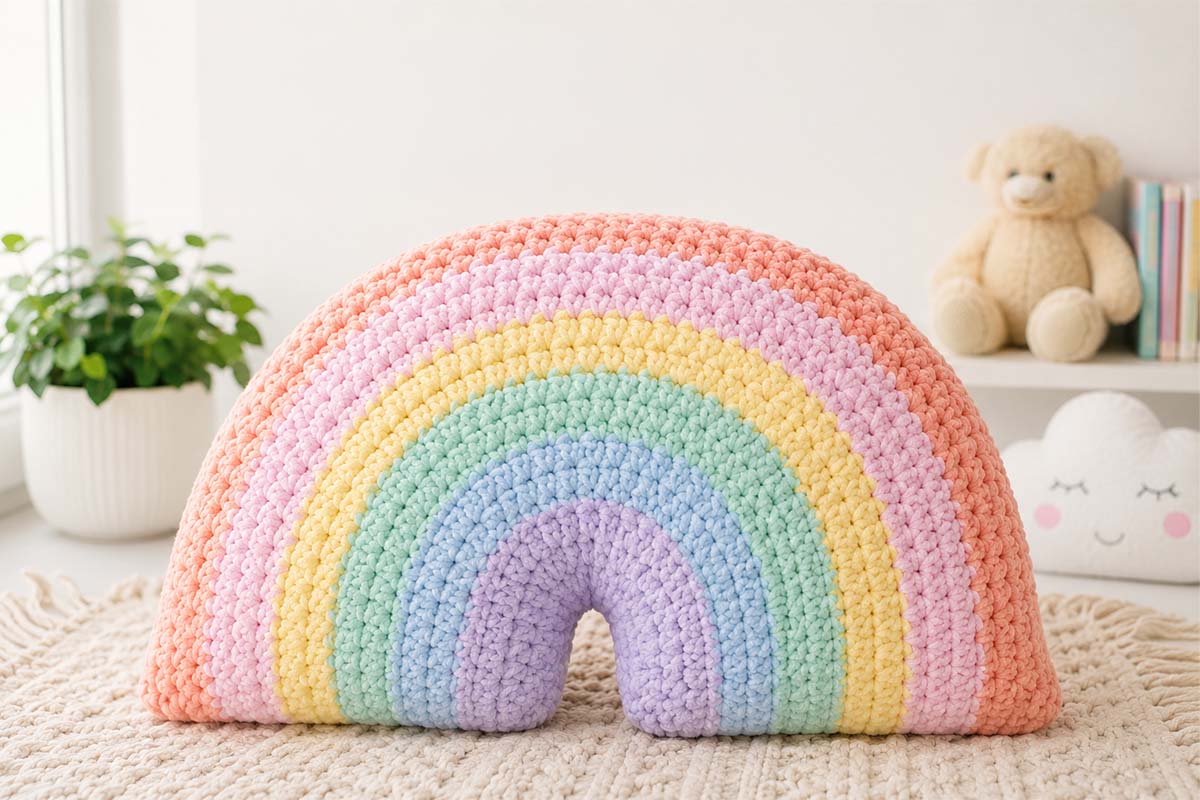

A rainbow pillow is one of those nursery pieces that works with every style — boho nursery, modern nursery, pastel nursery — and it photographs beautifully in any setting. Rainbow nursery decor has been a staple of handmade nurseries for years, and for good reason: it’s cheerful without being overwhelming, and the soft arc shape looks gorgeous whether propped on a shelf, tucked into a crib corner, or sitting on a nursing chair.
This particular design is worked in rows of single crochet with simple increases that gradually build the arc shape — no complicated shaping techniques, no working in the round. Each colour is worked for just two rows before switching to the next, so the colour changes feel natural and the ends are manageable. The front and back panels are identical, making it very easy to follow along.
The finished pillow measures approximately 18 inches (46 cm) wide and sits beautifully when stuffed with polyfill. It’s the perfect size for a nursing chair cushion, a crib corner prop, or a nursery shelf display.
Why make this instead of buying one? A handmade rainbow pillow in custom colours that match the nursery exactly is something no shop can offer. You can swap in any five colours you like — from bright primaries to the softest pastel gradient — and the recipient will know the thought and time that went into it. It typically takes one evening to crochet and an afternoon to assemble and stuff.
What skill level do you need? This pattern uses only single crochet and basic increases (working 2 sc into one stitch). If you can single crochet in a straight line, you can make this pillow. The shaping happens automatically as you follow the stitch counts.
Materials
- Yarn: DK weight cotton or cotton-acrylic blend, approx 50g each in 5 colours:
- Colour A: Sky Blue
- Colour B: Mint Green
- Colour C: Soft Yellow
- Colour D: Blush Pink
- Colour E: Peach
- Hook: 4mm (US G/6)
- Other: Polyfill stuffing, yarn needle, scissors
- Gauge: 18 sc x 22 rows = 4 inches (10 cm) in single crochet
Abbreviations
- ch — chain
- sc — single crochet
- st(s) — stitch(es)
- RS — right side
- rep — repeat
- rem — remaining
- tog — together
Notes
- The front and back panels are worked identically — make two.
- To change colour: work the last stitch of the current colour until 2 loops remain on hook, then draw the new colour through to complete the stitch. Cut the old colour leaving a 6-inch tail.
- Weave in all ends before seaming.
- The pillow is shaped like a half-circle arc — increases in the centre rows create the gentle curve.
Pattern Instructions
Front Panel (Make 2)
Foundation: With Colour A, ch 22.
Row 1 (RS): Sc in 2nd ch from hook, sc in each ch across. Turn. (21 sts)
Row 2: Ch 1, sc in each st across. Turn.
Row 3: Ch 1, sc in first 9 sts, 2 sc in each of next 3 sts, sc in last 9 sts. Turn. (24 sts)
Row 4: Ch 1, sc in each st across. Turn.
Row 5: Ch 1, sc in first 9 sts, (2 sc in next st, sc in next st) 3 times, (sc in next st, 2 sc in next st) 3 times, sc in last 9 sts. Change to Colour B. Cut A. Turn. (30 sts)
Row 6 (Colour B): Ch 1, sc in each st across. Turn.
Row 7: Ch 1, sc in first 9 sts, (2 sc in next st, sc in each of next 2 sts) 3 times, (sc in each of next 2 sts, 2 sc in next st) 3 times, sc in last 9 sts. Turn. (36 sts)
Row 8: Ch 1, sc in each st across. Change to Colour C. Cut B. Turn.
Row 9 (Colour C): Ch 1, sc in first 9 sts, (2 sc in next st, sc in each of next 3 sts) 3 times, (sc in each of next 3 sts, 2 sc in next st) 3 times, sc in last 9 sts. Turn. (42 sts)
Row 10: Ch 1, sc in each st across. Turn.
Row 11: Ch 1, sc in first 9 sts, (2 sc in next st, sc in each of next 4 sts) 3 times, (sc in each of next 4 sts, 2 sc in next st) 3 times, sc in last 9 sts. Change to Colour D. Cut C. Turn. (48 sts)
Row 12 (Colour D): Ch 1, sc in each st across. Turn.
Row 13: Ch 1, sc in first 9 sts, (2 sc in next st, sc in each of next 5 sts) 3 times, (sc in each of next 5 sts, 2 sc in next st) 3 times, sc in last 9 sts. Turn. (54 sts)
Row 14: Ch 1, sc in each st across. Change to Colour E. Cut D. Turn.
Row 15 (Colour E): Ch 1, sc in first 9 sts, (2 sc in next st, sc in each of next 6 sts) 3 times, (sc in each of next 6 sts, 2 sc in next st) 3 times, sc in last 9 sts. Turn. (60 sts)
Row 16: Ch 1, sc in each st across. Turn.
Row 17: Ch 1, sc in first 9 sts, (2 sc in next st, sc in each of next 7 sts) 3 times, (sc in each of next 7 sts, 2 sc in next st) 3 times, sc in last 9 sts. Turn. (66 sts)
Rows 18-20: Ch 1, sc in each st across. Turn.
Fasten off. Weave in all ends.
Assembly
- Hold both panels together with right sides facing outward.
- Using Colour E and a yarn needle, whip stitch around the entire outer edge, leaving a 4-inch opening along the straight bottom edge.
- Turn right side out and stuff firmly with polyfill, shaping the pillow into a gently rounded arc as you go.
- Sew the opening closed with whip stitch.
Finishing Tips
- For a flatter, more decorative pillow: use less stuffing and flatten by hand before the seam closes.
- For a rounder, cushion-style pillow: stuff generously and close the opening tightly.
- Add a cloud embroidered at each end of the rainbow using white yarn and a simple satin stitch for an extra nursery-perfect touch.
Yarn Substitutions
Any DK weight yarn that is machine washable will work beautifully. Our favourite options for nursery decor:
- Paintbox Simply DK Cotton
- Hobbii Friends Cotton 8/4
- Lion Brand 24/7 Cotton
Avoid yarns with a lot of stretch (like pure acrylic) as they may cause the shaped panels to lose their arc. A cotton or cotton-blend holds the shape best.
Frequently Asked Questions
How long does this pillow take to make? Most crocheters complete both panels in 3–4 hours. Assembly and stuffing adds another 30–45 minutes. It’s a comfortable one-evening or two-session project.
Can I use a different fibre — like acrylic instead of cotton? Yes, but we’d recommend against a pure stretchy acrylic for this project. The shaped panels rely on the yarn holding its arc without sagging, and pure acrylic tends to lose its shape over time under the weight of the stuffing. A cotton or cotton-acrylic blend is ideal. If you use a soft acrylic, choose one with good structure (Paintbox Simply DK, for example) rather than a very stretchy variety.
Can I change the colours? Absolutely — any five colours that graduate nicely from one to the next will work beautifully. Popular combinations include: coral + peach + yellow + mint + sky blue, or blush + lilac + lavender + soft blue + sage. You could also make a monochromatic version in five shades of the same colour for a more subtle effect.
How much stuffing do I need? One standard bag of polyfill (200–300g) is usually plenty for one pillow. Stuff it generously for a full, squishy cushion, or use less stuffing for a flatter, more decorative display pillow.
Can I wash this pillow? Yes, if you used a machine-washable yarn. Use a gentle cold cycle and lay flat to dry. The pillow may need reshaping after washing — gently smooth the arc back into shape while it’s still damp.
Can I sell pillows made from this pattern? Yes — you’re welcome to sell finished items made from Bloom Bonnet patterns in small quantities. Please credit BloomBonnet.com when sharing photos online.
What if my arc doesn’t look even? Uneven arcs are almost always caused by inconsistent tension — the increase stitches at the centre of each row can feel awkward at first. Make sure each “2 sc in one stitch” increase is worked neatly and not pulled tight. Blocking the finished panels before assembly (dampening and pinning to shape, leaving to dry) will also even out any irregularities.