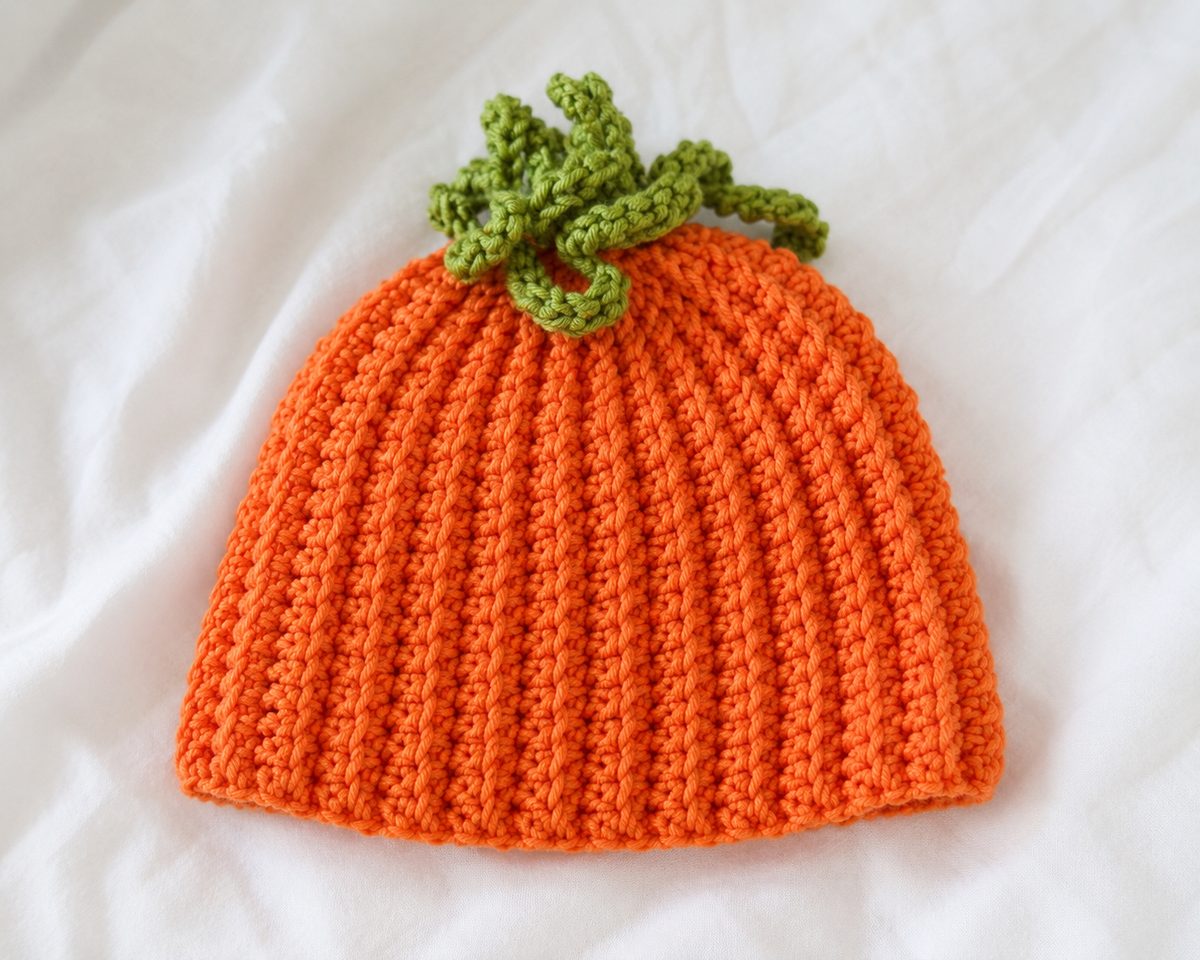

This free crochet harvest pumpkin baby hat is one of the most adorable fall baby gifts you can make. The body is worked in a warm rust orange with simple vertical ridges that mimic the look of a pumpkin — and a sweet sage green stem at the top finishes it off perfectly.
It’s beginner-friendly, worked mostly in the round with single crochet, and comes together in an afternoon. Make it in orange and green for a classic pumpkin, or try cream and brown for a more neutral “ghost pumpkin” version.
What Yarn Is Best For This Hat?
For a baby hat, softness and washability are everything. We recommend a soft DK weight cotton or cotton-acrylic blend — it gives great stitch definition for the ridge detail, holds its shape after washing, and is gentle against newborn skin.
You’ll need two colors:
- Main color (MC): Rust orange, burnt sienna, or pumpkin — approximately 50–60m
- Contrast color (CC): Sage green or olive — approximately 10–15m (for the stem only)
One 50g ball of each color is more than enough for one hat.
Avoid itchy or scratchy yarn. Press it against your cheek — if it scratches there, it’s not suitable for baby skin.
Materials
- MC: DK weight yarn in rust orange (approx 50–60m)
- CC: DK weight yarn in sage green (approx 10–15m)
- Hook: 4.0mm (US G/6)
- Notions: Stitch marker, tapestry needle, scissors
Gauge
16 sc × 20 rounds = 4 inches (10 cm)
Gauge matters for hats — check yours before starting and adjust hook size if needed.
Sizes
| Size | Head Circumference | Finished Hat Circumference |
|---|---|---|
| Newborn | 13–14 inches (33–36 cm) | 13 inches (33 cm) |
| 0–3 months | 14–15 inches (36–38 cm) | 14 inches (36 cm) |
| 3–6 months | 15–17 inches (38–43 cm) | 15 inches (38 cm) |
| 6–12 months | 17–19 inches (43–48 cm) | 17 inches (43 cm) |
Pattern is written for 0–3 months. Adjustments for other sizes are noted in brackets.
Abbreviations
| Abbreviation | Meaning |
|---|---|
ch |
chain |
sc |
single crochet |
dc |
double crochet |
sl st |
slip stitch |
BLO |
back loop only |
MC |
main color (orange) |
CC |
contrast color (green) |
st(s) |
stitch(es) |
rnd |
round |
Pattern is written in US terms.
How To Crochet The Harvest Pumpkin Baby Hat
How To Make The Crown
With MC, make a magic circle.
Round 1:
- Ch 1 (does not count as a stitch)
- Work 6
scinto the magic circle - Pull tail to close the center
Sl stto first sc to join (6 sts)
Round 2 — Double increase:
- Ch 1
- Work 2
scin every stitch around Sl stto join (12 sts)
Round 3:
- Ch 1
- *2
scin next st, 1scin next st* — repeat around Sl stto join (18 sts)
Round 4:
- Ch 1
- *2
scin next st, 1scin each of next 2 sts* — repeat around Sl stto join (24 sts)
Round 5:
- Ch 1
- *2
scin next st, 1scin each of next 3 sts* — repeat around Sl stto join (30 sts)
Round 6:
- Ch 1
- *2
scin next st, 1scin each of next 4 sts* — repeat around Sl stto join (36 sts)
For 3–6 months add one more increase round: *2 sc in next st, sc in each of next 5 sts* = 42 sts. For 6–12 months add two more rounds to reach 48 sts.
The crown should lie flat after the final increase round. If it cups, go up half a hook size.
How To Crochet The Pumpkin Body
The pumpkin ridges are created by working in the back loop only — this leaves a raised bar on the front of the hat that looks just like the ridges of a real pumpkin.
Rounds 7–16 — Pumpkin body (worked in BLO):
- Ch 1
- Working in
BLOonly:scin every stitch around Sl stto join- Repeat for all 10 rounds (36 sts each round)
For larger sizes, work 12 rounds for 3–6 months, and 14 rounds for 6–12 months.
As you work, you’ll see the vertical ridges forming down the sides — these are your pumpkin lines. Keep your tension even throughout for the neatest ridges.
How To Crochet The Hat Brim
The brim is worked in both loops with a simple increase to create a gentle flare.
Round 17 — Brim start:
- Ch 1 (working in both loops again)
- *2
scin next st,scin each of next 2 sts* — repeat around Sl stto join (48 sts)
Round 18:
- Ch 1
Scin every stitch aroundSl stto join (48 sts)
Round 19 — Final brim round:
- Ch 1
Scin every stitch around- Fasten off MC, leaving a 15cm (6 inch) tail
- Weave in end
How To Crochet The Pumpkin Stem
The stem is a small tube worked flat and rolled — it gives the hat that perfect little pumpkin top.
With CC (sage green), ch 8.
Row 1: Sc in 2nd ch from hook, sc in each ch across. (7 sc) Ch 1, turn.
Rows 2–6: Sc across. Ch 1, turn.
Row 7: Sc across. Fasten off, leaving a 25cm (10 inch) tail.
Roll the rectangle into a tight tube lengthwise. Use the tail to sew the long edge closed, then sew the stem securely to the center top of the hat. The stem should stand up slightly when attached — work a few extra stitches around the base to keep it upright.
Finishing
- Weave in all ends securely using your tapestry needle
- Attach the stem to the center top of the hat as described above
- Block lightly by dampening the hat, shaping it over your hand, and leaving to dry flat — this evens out the stitches and defines the pumpkin ridges beautifully
- Machine wash at 30°C in a mesh laundry bag, reshape and lay flat to dry
Tips For Best Results
Even ridges: Keep your tension consistent when working in BLO. If you tend to crochet tightly, go up to a 4.5mm hook for the body section only.
Color choice: The hat looks best in a true pumpkin orange — avoid anything too red or too yellow. For a more neutral look, try cream yarn with a tan or brown stem for a “ghost pumpkin” effect.
Stem stability: Work extra stitches around the base of the stem when attaching to make sure it stays upright and doesn’t flop to one side.
As a gift: This hat pairs beautifully with the Bloom Bonnet ribbon booties in cream or ivory for a complete fall baby gift set.
Frequently Asked Questions
What size does this pattern make? As written, the pattern makes a 0–3 month hat. See the size chart above for adjustments to other sizes.
Can I use worsted weight yarn? Yes — use a 5.0mm hook and expect a slightly thicker hat. Check your gauge and adjust the number of body rounds for the right depth.
Can I skip the brim? Absolutely. Fasten off after Round 16 for a simple beanie-style hat without the brim. It still looks adorable.
Can I sell hats made from this pattern? Yes — you’re welcome to sell finished items made from Bloom Bonnet patterns. Please credit BloomBonnet.com when sharing online.
How do I make the pumpkin ridges more defined? Make sure you are working strictly in the back loop only for Rounds 7–16. The front loop left behind creates the raised ridge. Blocking the finished hat also helps define the ridges.